It was not easy to change deeply ingrained habits. For my entire life I have handled paper. Over the years I developed a workflow that, well, worked-for paper. My process was familiar and comfortable. But, my workflow was developed around paper and filing cabinets, not digital communications and mobile devices.
Adding to the difficulty is the fact many people still operate in both the digital and analog worlds. I receive much unwanted paper in meetings, at conferences, and in the mail. And I receive an ever increasing avalanche of digital documents and communications.
Everything was jumbled together. Projects consisted of paper documents, digital documents, emails, and websites. Meeting notes were on legal pads with followup communications in email. Finding, producing, sharing, and consolidating information from the paper and digital worlds was becoming increasingly complex and frustrating.
The struggle was not convincing myself that I needed to go paperless. The struggle was finding the right combination of software and hardware and designing an easy to manage workflow that worked across platforms without unnecessary overlap and complexity. The struggle was also forcing myself to abandon old habits and create new ones.
After much trial and error, I can confidently declare that I am now happily and productively paperless. I can also assert that short of an apocalypse, I will never go back to using paper.
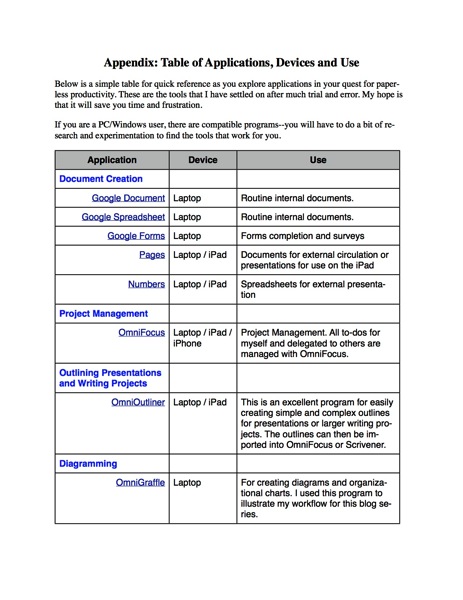
The information below is a summary of the tools I use and my workflow. I am not attempting to provide a step-by-step guide for these tools. Instead, my propose is to offer a model and way of thinking about these tools and workflow so that you can adapt them to your situation, needs, and preferences.
Hardware
For years I was a diehard PC and Windows user. My software and workflow revolved around the Wintel platform, including Microsoft Office. I have switched to Apple hardware and for most, not all, document production and communication I rely on cloud-based services such as Google. The reasons for the switch are explained below.
But—and this is important—this series of articles are not intended to promote one platform over another; one can be equally successful in moving to a paperless workflow using the Wintel platform. It is not necessary to switch to the hardware and software applications I have listed below. There are equally, and perhaps in some cases, better services and applications from other companies. The key is understanding what is needed to go paperless so that you can choose the best combination of hardware, software, and services to meet your needs. For me, after years using Windows software, I have switched to Apple and Google hardware, software, and services.
I use the following hardware: Macbook Pro Retina, iPad with a Logitech FabricSkin Bluetooth Keyboard Folio, an iPhone 5 and a Fujitsu scanner. I chose to move to Apple hardware because I became convinced that for my purposes they are more reliable and require less work to maintain. Because the hardware and software are designed by the same company they work seamlessly together. Apple support is rarely needed and is excellent in those rare instances when it is needed. Support is readily available by phone or from the local Apple store. The fact that the hardware is beautiful and pleasant to use is a bonus. I want to again emphasize, however, that for others the Wintel platform may be better.
Applications and Services
The following list is not comprehensive; it is a summary of the major applications and services I use for the majority of my work. For each application I will provide a brief reason for the selection and how it is used. Later I will share how I use the applications for my workflow.
Document Creation
Frankly, before switching to Apple and Google products I was nervous. Being a Microsoft and PC power user, I was concerned that I would lose the power and flexibility that I needed to get my work done. I was apprehensive that I may not have access to the best software and that I would have trouble integrating my workflow with colleagues and friends who were on the Wintel platform.
My fears proved to be unfounded. I didn’t lose anything—in fact, I gained a great deal. Whereas on the PC/Wintel platform I was restricted to Microsoft, Windows-based, and Google products, on the Apple platform I had access to every application made for all three platforms: Microsoft Office for the Mac, Apple’s iWorks and iLife application suites, and Google’s applications and services. I also had access to any Windows-based software I needed to run by running Virtual Box or Parallels on my Mac. In other words, I have the best of all worlds.
What surprised me the most is that I found myself not needing or wanting to use Microsoft products (except for the occasional complex Excel spreadsheet) or other Windows-based applications. I have found wonderful, and often superior, substitutes for everything I used on my PC. I have nothing against Microsoft. They sell arguably the most feature rich professional office software on the planet. If your work requires the production of complex spreadsheets and text documents, you cannot beat MS Office. I found, however, that for 95% of my work, I did not need the complex or advanced features. For those few (and they become rarer by the week) projects that require advanced features, I can fire up MS Office for the Mac and do whatever I need to do.
Google Apps (Documents, Spreadsheets, Forms, Drawings)
Google offers a full suite of products and services. You can find a comprehensive list here. Google’s applications provide the basic features most people need but they lack some advanced features. There are several advantages of using Google Apps (note: Microsoft’s Office 365 suite and SkyDrive offer similar features but I have found their collaboration capabilities to be less capable than Google’s). The apps are free or very low cost, they are always up-to-date, you do not have the overhead of maintaining and supporting the software, and most importantly for workflow, you can collaborate and share documents without the need to constantly send attachments in emails, although you can if you desire. For a good comparison between Google Apps. versus Office 365 click here. The author is a bit biased toward MS but it is a good comparison.
I use Google Apps (Documents and Spreadsheets) for creating basic documents, collaboration, and sharing. I also use them when I need to collaborate with people outside of the school. Google applications are my no frills, workhorse applications.
Apple Pages and Numbers
I use the Apple’s Pages application when I want to produce a slick, professional looking document or newsletter to send to others. I also use Apple Pages for all text-based presentations that I give. By saving the presentation as a Pages document in iCloud, I can easily access it on my iPad for my many speaking engagements. iCloud keeps both versions in sync. I may draft the document in Google Docs or ByWord on my Mac (for example, I wrote the draft of this article using ByWord: more on the reason for this below) and then pasted the content into Pages for polishing. I use the Drafts application when taking meeting notes on the iPad.
I use Numbers when I want to produce a basic but well designed spreadsheet with visually informative and appealing charts. Numbers is a good application but lacks many of the advanced features found in Excel.
Word and Excel for the Mac
Surprisingly, I no longer ever need or desire to use MS Word. I can open any Word document I receive in an email in Pages or Google Docs. I find MS Word to be a feature rich but bloated with a complex and distracting interface. Excel is unquestionably the most capable spreadsheet program you can buy. I use Excel when I receive an Excel spreadsheet from others. I also use it when I need to produce or work with a complex spreadsheet. There are times when there is no substitute for Excel. In those instances I fire up Excel for the Mac.
ByWord
Modern word processors can be distracting because they tempt one to fiddle with formatting the text. This creates distraction when you need to focus on your words--and just your words. This is why I use ByWord. It is a beautifully designed minimalist application that does two things extremely well: it enables you to write free of distraction and it syncs with your other products through iCloud and/or Dropbox. Click here for a screen shot of a draft I created for a blog article.
I have ByWord on my Mac, my iPad, and my iPhone. I can immediately begin work on a draft document whenever I have a few undistracted minutes, e.g., on the plane. Because it is minimalist in design, it also uses less battery power enabling me to work longer when I don’t have access to a power outlet.
Once the draft is finished in ByWord, I export it as an RTF or HTML file to Google or Pages for finishing. It can also be exported as a Word or PDF document.
Apple Keynote
Keynote is a fantastic application for producing compelling, fresh presentations. It is powerful and feature packed but easy to learn and use. Because it uses iCloud to sync seamlessly with the Mac and other iOS devices, I can produce a beautiful presentation and then use my iPad for the presentation. This is perfect for traveling to conferences. I produce the presentation on my Mac (you can also produce them on the iPad but the iPad version is a bit more limited), sync it to iCloud, and leave the laptop at home. At the conference, I connect my iPad to a projector and use my iPhone as the remote. Simple, light, and fast. And, if I make revisions to the presentation en route to the conference and make additional revisions after the presentation, all of the changes are synced to iCloud. When I open my Mac, the revised presentation is ready for me. This same process works with Pages and Numbers.
Keynote also syncs seamlessly with iPhoto and iMovie. Consequently, you have a simple and consistent way to add beautiful photos and compelling videos to your presentations and everything is always in sync and available across all of your devices.
Document Sharing and Archiving
Google Drive
Google Drive does three things extremely well: It is the access point for all of your Google applications and documents, it archives and saves your documents automatically, and it is the platform for collaborating on and sharing your documents. Google Drive also enables you to create, edit and save documents offline (using Google’s Chrome browser) so that you do not need an Internet connection to get work done. Once you are back online, Google Drive automatically saves and syncs your documents.
Evernote
Evernote serves a very specific and useful purpose. It is my primary repository for document archiving, retrieval, and sharing when I do not need to work on them. The distinction between Google Drive and Evernote is important. While there is overlap, e.g., both programs save, archive and sync your documents and information, Google Drive is best for “living, active” documents. Evernote is best for static reference material.
For example, any work related document that is being worked on, or that ever may need to be worked on by others, is in Google Drive. Letters, policy manuals, spreadsheets, schedules, etc., fall in this category and are on Google Drive.
Receipts, research articles, articles from the internet, User Manuals, and any other static document that is used for reference are in Evernote. I also store important personal documents in Evernote, e.g., insurance papers. That way, if there is a fire I still have access the critical documents. Although I could store these in Google Drive, Evernote is better at quickly capturing information from the web on your laptop or mobile device. It is ideal for quickly searching to find just what you need. If you have a Business Account with Evernote, you can also create a Business Library of reference material for employees, e.g., Technical How-To articles from the IT department, Employee Manuals, etc.
Communications and Calendaring
I average over 1,200 business emails each month (not counting personal emails). I also receive many phone calls and text messages. Efficiently managing and curating this flow of information requires the nimbleness of a ninja and the discipline of an Olympic athlete. It also requires the right tools.
I have tried just about everything available. I spent years on Outlook (including SharePoint) and was very comfortable with the program. It is powerful and designed for the enterprise. For the same reasons I have stated above, I decided that it was time for a change. As a school, we no longer wanted to be in the email and server business. We wanted our IT staff to focus on supporting technology integration in the classroom, not on managing email, SharePoint, servers, and antivirus software.
With our move to Google products, we also adopted Gmail, Google Calendar, Google Hangouts (for video-conferencing), Google+ (which we use for business related social media interaction), and a host of other applications that are integrated and cloud-based. As a consequences, we spend far less time (and money) managing email and calendars and we are able to integrate document creation and sharing with all of our digital communications. This enhances productivity, saves money and gives us capabilities that would otherwise be too complex and time consuming to manage.
I have vacillated between using Gmail and Google Calendar in the browser (Safari and Chrome) or using Apple’s Mail and Calendar applications (or 3rd party applications). After experimenting with many options, I have settled on Apple’s Mail for email and BusyCal for my Calendar application. While there are advantages to using the browser version of Google products, the overall hardware and application integration on the Mac and iOS devices is better when using Apple’s applications or well designed third-party applications like BusyCal. I have also found, after spending time to master it, that Apple’s Mail program is very powerful making it easy to process an overflowing inbox quickly. BusyCal is beautifully designed and powerful. It has a built in to-do system and a menu icon that drops your calendar into view as needed and then retracts it when you are finished. This saves valuable screen space and is one less window to manage.
For meetings and collaboration that do not require a face-to-face meeting but do require live communication rather than a torrent of emails, I use Google’s powerful Hangouts video-conferencing application. You can conduct a simultaneous video call with 10 people and share Google documents and/or your desktop during the call. It is a powerful program and is free. There is also an iOS application for Google Hangouts enabling you to place video calls from your iPhone or iPad when traveling.
Phone Calls
Going paperless works great for handling phone calls. My administrative assistant takes messages in a shared Google document titled “Dr. Mosbacker’s Messages.” Each morning she opens that document and enters the date. During the day she records the messages and return phone number. This document is an open tab on my browser. When I am ready to return calls, I click on the browser tab (from my Mac, iPad, or iPhone) and have all of the information I need. I can then make notes of the call in this same document and mark the call completed when I’m finished. If I ever need to find that message, person’s name, or contact information, I can search the message document from any of my devices. No paper, everything is archived and searchable. Click here for a screen shot of my messages.
Note Taking
I have a lot of meetings and I have to take a lot of notes. I want to do so in meetings without coming across like a geek. There are several challenges in taking digital meeting notes.
If you use paper, you are not paperless so you have to retype notes you need to keep (or scan them). You can’t efficiently share paper notes, and they are not immediately connected with your other documents and communications.
If you use a laptop in a professional meeting you can come across as geeky in some settings. The clacking keyboard is distracting and the screen puts a barrier between the attendees. And you are tempted to multitask (check email) rather than giving the attendees your undivided attention.
I have found the iPad to be the solution. It is light, is not distracting nor especially geeky, has long battery life and provides several note taking options not typically available on the laptop. You can type your notes using the silent virtual keyboard, you can use an iPad case with built in bluetooth keyboard (my preference), or you can handwrite your notes using a stylus with a note taking application like Notability. The best method will depend on the person and circumstances.
My objectives are to use as few applications a possible, produce digital notes, have them safely archived for future reference, and have an efficient way to delegate and keep up with tasks flowing from the meetings.
After much experimentation and no small amount of frustration, I have found a very effective and efficient system that meets my objectives. This is far simpler then it may sound but essentially I use and application called Drafts in combination with TextExpander—this program is reason enough to use a Mac!
As indicated above, I use ByWord for writing drafts of larger documents, e.g., a blog article, chapters in a book, etc. For meeting notes I use Drafts. It automatically saves your work and syncs it to your other iOS devices. It is distraction free, does not require much power, and works great on the iPad and the iPhone. When combined with TextExpender one can open Drafts and with a few quick keystrokes have TextExpander drop a meeting template into Drafts and you are ready to go.
One of Drafts most compelling features is the ability to send your meeting notes with just one click to Evernote, an email, Dropbox, OmniFocus, Twitter, Facebook, as a TextMessage and a host of other applications and services too numerous to list. You can also use “Open in” to export a draft to any other app installed that supports importing text files. Click here for an illustration.
You can type quietly on the iPad using the bluetooth keyboard case. After you have completed your meeting notes, including to-do items for yourself or others, you select each item and send it to OmniFocus (more on OmniFocus below) or Evernote (my preference because then all of my meeting notes are archived in the appropriate project notebook). For example, I have an interview template in TextExpander. Prior to the start of the interview, I open my iPad, fire up the Drafts app., and open the interview template with TextExpander. When the interview starts, I discretely take my notes in Drafts using the embedded template. After the meeting is over, with one click I send the notes to Evernote for archiving. No paper. No filing. And, I can always access these notes on any device, anytime, anywhere. I can also share my interview notes with my administrative assistant or others as needed.
Project Management
Finding THE project management tool has been my biggest challenge. For my purposes, the ideal project management application would:
- Work on all of my devices.
- Be powerful and flexible without being overly complicated.
- Be developed and supported by a company that I trust and was confident would be around for a long time.
- Integrate tightly with my other major applications (Google Docs, ByWord, Drafts, Gmail, Apple Mail, BusyCal, and Evernote).
- Enable actions and viewing of projects, tasks, and documents by project, date, person, or context.
- Alert me when projects were coming due, were due, or were late.
- Give me the ability to create tasks or projects directly from emails, Drafts, or Evernote without copying and pasting.
OmniFocus does all of this and more. The capabilities will be briefly illustrated in the next article in the series but suffice it to say that OmniFocus integrates all of the above features into one powerful yet relatively simple product. That is no small feat! Click here for a sample screen shot.
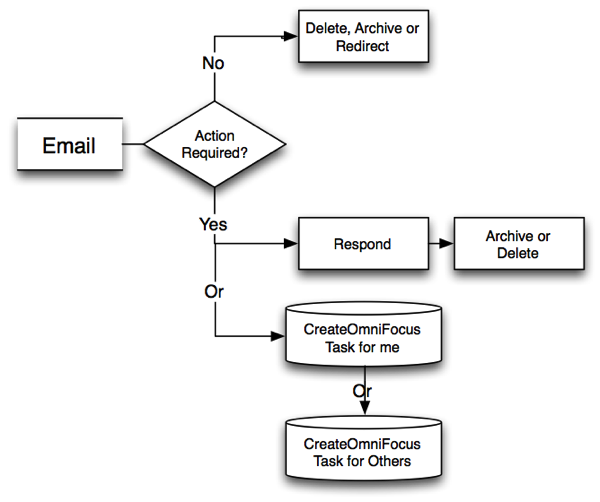
In my next and final post (Part 3: Workflow--putting it all together) in this series I illustrate how I use the hardware and software to create a paperless workflow. I will also provide diagrams illustrating how the workflow works for emails, paper documents, and meetings.
Google